
For Part 1 of this process, go here...
Finishing the Blade
So what's next?
After some delay for the holiday shipping, the blade finally came back from the Heat Treat Folks. It looked about like you'd expect...
At this point, if your blade is back in one piece, you are ready to roll. All of the metal work from Part 1 is about to yield results. From here on you should assume the blade will cut you (even though right out of the box it probably won't) and you are going to need some additional supplies. Those are:
- 220 Grit Sand Paper and lots of it. I buy it in a large box at Lowe's.
- A flat rigid surface that you can work on without concern for how dirty it gets. I used plywood for this project.
- Scales
- Pins
- Blue Painters Tape
- Q-Tips
- Acetone
- Epoxy
- A good polishing paste like Flitz
Finishing The Edge
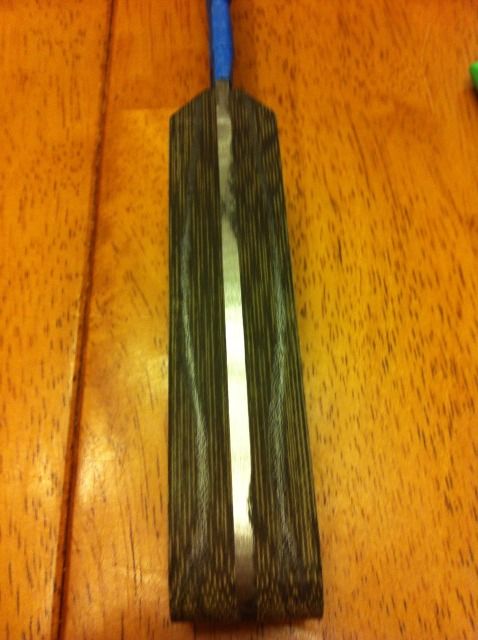
This is the first seemingly counter intuitive thing we're going to look at doing in this process and it is this way for a reason. We're going to want to get the unsanded, unfinished blade to about shaving sharp before we go any further. This is essentially the same process we followed prior to heat treatment where we sand by hand and attempt to keep the angles aligned. Most all of the work should be done on the 220 grit paper. ( For this knife, I used 15 full sheets to get to the edge I wanted...) In the end, it will look something like this when you are ready to move on to the next step.

Finishing the Blade
At this point, if you can shave with it, it's time to sand the blade flats to a finished state. I usually start with 400 grit and gun oil and sand from the top to the first pin hole with long strokes. Back and fourth will produce an effect called fish hooking. Depending on your goals for a finish, this can either be nothing at all or a huge pain.
I also oil the blade to wipe it down. It seems to help in keeping the satin finish unmarred. I keep this up through each of the grades of sandpaper until I get to 800. You can take this further I just like to stop there.
Marking
Putting your mark on a blade is a really optional thing and spending money on the gear to etch it is 100% not required. If however you want to mark your blade there are a number of pretty solid tutorials out there that explain how it works.I have had great success using the "dangerous" method. This involves using an old wall plug in transformer like a cell phone charger, a couple of alligator clips, some salt water, and a cotton swab. The marks are deep and clear and the stencils don't burn up. Try this at your own risk and ensure you have a fire extinguisher.

For stencils I recommend these folks at TUS Tech: http://www.tustech.com/admin/ecst Jan's a great guy to deal with and I had excellent results with their stencils. As far as maker's marks go, have a look around and see what you like. The one above is for my personal stuff and is really large... plus I like Geese. :)
Finishing the Blade
At this point, if you haven't burned the house down, you have a shaving sharp blade, finished to 800 grit, possibly with an etched makers mark. This means that everything that really alters the blade itself is done. Once these steps are completed, I like to put a nice polish on things. I really like using Flitz for this. The etching process usually leaves things looking like this on the blade.
After a quick rubdown with the polish, it looks like this. Once am happy with the results, I take the blue tape and wrap the blade three times from the tip to about where the scales will start.

OK. At this point go take a break and put on clothes you don't care about. This next bit can get messy... :)
The Handle
From here on out we're working on the handle for this knife. While the edge and steel associated factors are critical to the tool's ability to do the job, the handle is key to the tool's comfort and is the interface for effort and feedback associated with the work it does. There are as many opinions about what makes a good handle as there are hands to hold them. This is how I do it...Prepping and Attaching the Scales
For this exercise I chose to us some green canvas micarta. It's a tough and workable material and good to learn with in a dark colors because it shows things (missed sanding spots, gouges, etc.) very well. When you using scales that don't have to be book matched, I find it is easier to cut each scale individually and then mate them up once they are drilled.First off then, you are going to want to get an outline of your blade on the scale. For darker colors, I use a silver sharpie. One thing you need to ensure before tracing is that there is enough material between the front pin and the start of the edge to shape the scales the way you want and that it goes as far forward as you want it to. You can't go back and add scale material on later. Check it a couple times before you start. Acetone removes sharpie markings from scales if you need to redo... :)

Next, using either a scroll saw, band saw, coping saw or something similar , you want to cut away the excess scale material ensuring you do not cut inside the line. You want a little excess for now. Too much makes a lot of work but you need a little...

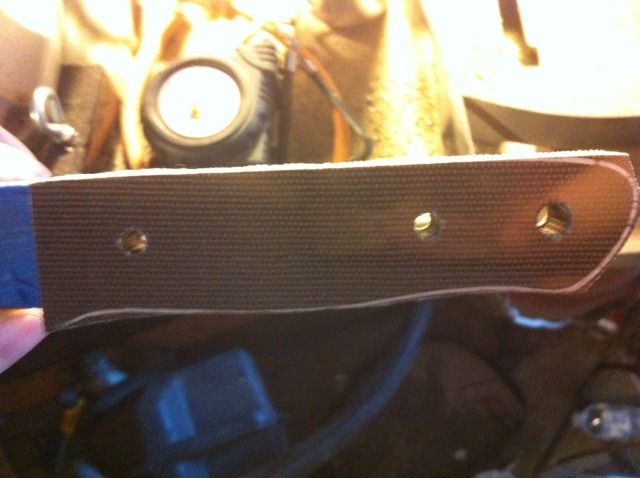
After you have scales cut, the next step is drilling pin holes. For this type of knife with this type of pin, I find that taping the the blade to the scale with two sided carpet tape works very well. Ensure the tape does not cover any of the holes. The drill will get through it but it does seem to gum it up a bit.

Using the blade as a stencil works very well. Before drilling make sure you have the blade completely inside the scales with no places where the steel is proud of the micarta. Drill both scales this way.
When drilled out they should look something like this when completed. (Unobstructed daylight.. :) )
Once this is completed, remove the scales from the blade. Then pass the drill bits appropriate to the size holes in the handle, through them one more time on the press. This will remove a few thousandths of material and will help later. The impact will not be noticeable in appearance however when fitting these together, the pins will be very tight with out doing this. It makes a dry fit test very mush easier.
An important step after the scales are cut and drilled is insuring that the leading edges line up. Here's an example of what I am talking about...

You can use the drill bits or a couple of chunks of pin stock to line up the holes. When you do you may notice an offset in the leading edges. These will need to be squared up. I used the belt sander but a saw would work as well. Remember, they don't have to be perfect. They just have to match.

Once these are squared and matching the next job is to finish the leading edge of the scales however you choose. It's important to because finishing these once attached is something that will scratch the crap out of the blade and is almost impossible to pull off all the way down where the scale meets the steel. Also, at this point I make the sides of each scale to show inside and outside clearly. It prevents confusion later which can be bad if you finish the edges the way I typically do...
Next up I like to shape the leading edges the way I want for the knife. Most times this is a rounded thing but for this one I am going to shoot for a straight line. I like to reduce the edge's thickness down and add a bevel like this. Make sure they sides match up and then sand to your desired finish. I typically do up to about 800 grit and sand with oil after 220. NOTE: Using something like the drill bits to ensure the pin holes line up line while checking.

After this, there's really only on more step in the prep process. The sides of the scales that will be attached to the blade (The ones marked with an I in my case...) Need to be roughed up. I do this in two steps. First, I remove the finish on the inside of the scale with the sander.

Next, I use a drill bit, but anything that can do this will work, and dimple the surface of the scale to provide some more surface area and a few more places for the epoxy to bond.
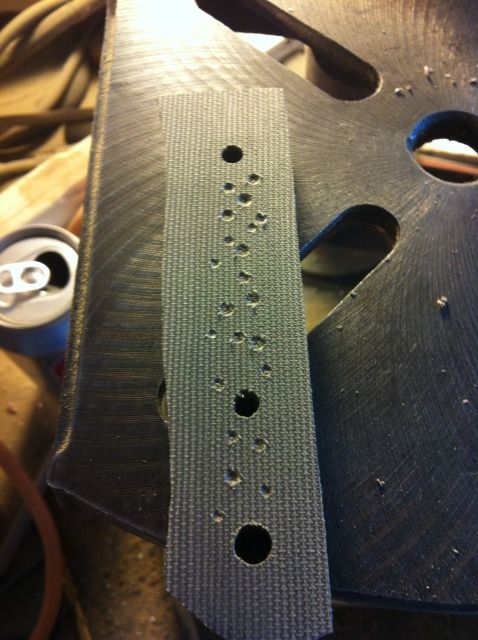
Hit it with some sand paper to remove the hanging bits on the dimples and you are good to go. Next stop is glue up.
Putting it all Together
At this point you are ready to attach all the parts. You will need to cut your pins and lanyard tube. I typically measure them a lot longer than they need to be just in case I need to move / pull / twist / whatever on them.
I like to check things once without the epoxy just to make sure there are no big alignment issues or anything like that. This is also the time to make sure that the tape on the blade is clear of the scales. Once it gets cemented in there, you can't get it out. Peel it back as needed.
If everything fits together, you are ready to glue. You may have to use a hammer and punch to get the pins back out. Do it with care and they should be fine. Next, you'll want to get your epoxy mixed up. I recommend Devcon 2 Ton. The stuff is fricking tough and easy to work with.

Depending on how your blade goes together you'll need to adjust this next part to make sense of how you find it works best.
The way I do the glue up is as follows:
1. Pick a scale and put the pins all the way through it.
2. Mix epoxy per instructions
3. Coat entire inside of scale with pins in it with thin coat of epoxy.
4. Fit blade over pins and place against scale. Make sure contact is snug and some epoxy is in the holes in the blade.
5. Fill in holes on the blade with additional epoxy
6. Coat inside of remaining scale with epoxy and fit to pins
7. Use small hammer and a dowel as needed to seat the scale to the blade.
8. Adjust pins as needed.
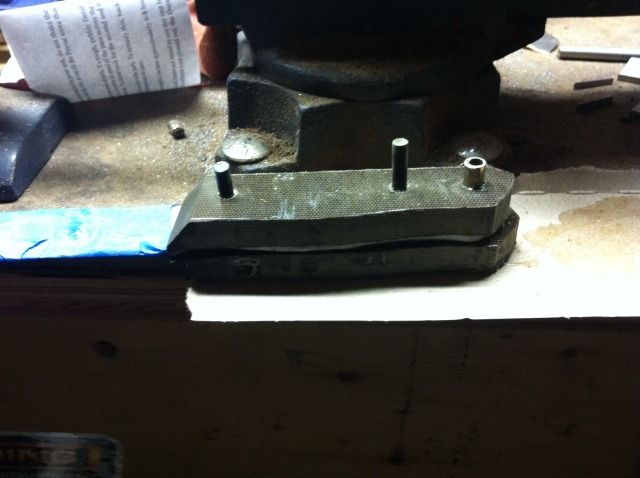
9. Place blade in vice with handle exposed and remove excess pin stock via hacksaw.
10. Unclamp blade and clamp handle in vise. Clamp as tight as you can. You will want to see epoxy oozing out of the blade / scale seam. It'll look something like this.

At this point, I typically use acetone and a cotton swab to remove the epoxy along the top line and...

Once the scales are glued and the knife is in the vice, you are ready to move on. First you have to let this dry and set up. I know what the package says setup time is. I usually leave mine for 24 hours, clamped and under pressure.
Finishing the Handle
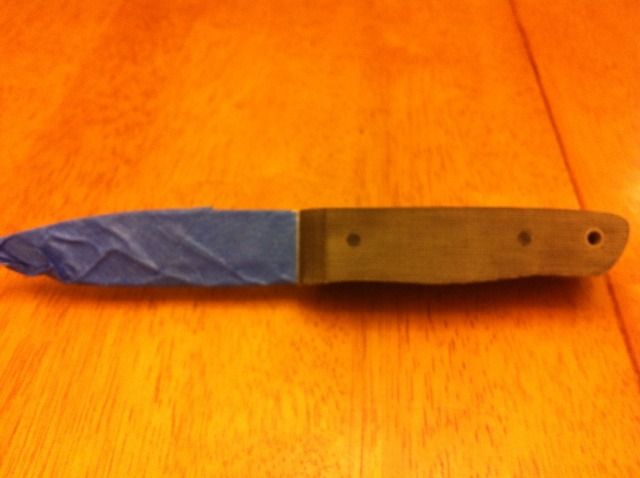
Once things have set up and you are comfortable unclamping the knife from the vice, it's time to start working the handle into the final shape you are after.When the knife comes out the vice it will look something like this though hopefully not as blurry.

Next I like to square up the exposed sides of the handle and get all of the pins flush with the handle surface.

Next, you will need to sand the scales down the match the profile of the handle of the blade. For this I like to use a drum sander on my drill press. It works OK but requires some practice to avoid big waves in the finish. This process can also be accomplished with hand sanding.

When you get this down and in a good place, things really start to look like a knife...
Handle shaping is only tricky if you have no idea how you want to shape the handle. I have had a lot of luck with the coke bottle shape and with just a standard cigar type shape. Here, I am going to use a coke bottle design.
I find that it's easier to start with the handle if shape it the way we want it to look from the spine of the blade. To do this, I start by pencilling in the rough outline of the widest parts of the handle outline. I follow this line to create the final shape before the contouring begins.
I like to use a sander to remove the bulk of the material before shaping starts but you can also do this with a file. It just takes time and a bit of patience. Once you have your rough shape and are ready to contour, it's time to switch to a file for the rest of the material removal process.

Once the contour is complete and all of the really big gouges are removed either by file or course sand paper it's time to finish sand. The blade starts out looking something like this.

Once you are done, unwrap the blade and wipe it off. Mine looked this this.

I stopped at 600 grit because I like a little texture on the handle. Mirror shiny micarta is slick as doo doo ... :)
Take that blade and head out to the woods. Beat it up and see how it does. Thanks for reading along and please feel free to send questions if you have them. I may have missed something here so please let me know if you see that. Thanks again,
-JP

1 comment:
Thank You, Sir.
I am not a knife maker and probably will never be one, but, I do enjoy
owning, using and depending on a good knife. Especially one made by a
craftsman like yourself.
I am sure that your tutorial will help those who want to try their
hand at making their knife. Also, it will help those, who like me, enjoy knives. Understand
the process and maybe be a bit more patent when waiting on a custom
made knife.
Thanks again.
Post a Comment